
Firstly, I created a new layer to begin my work on.
To use this brush I selected the paint brush tool on the side bar, then I put my curser oner the paint bruh tool at the top of the page to select a brush and change the use, opacity and the colour.

I then started to find some new brushes from brusheezy. I found this watercolour brush. To download this I clicked free download and saved it to my files. Select this in your files and right click to the setting "Extract All". To then import this onto photoshop, go to brush selection settings at the top of the page and click the brush options. Then click the settings button at the top right hand corner. One the options Coe up from there you go to import brushes and find the brush in your folder. Your brushes should then be imported at the bottom of all the other default brushes.


For this brush, I created a background and clicked the paint brush selection to create this purple background. After I then chose the erase tool and chose the brush I wanted so it cut out into the background.

To create this effect on photoshop firstly, you need to copy a picture from the internet or from your own photos. Go up to image and select mode and greyscale, then press don't flatten. After go to the mode selection again and click RGB colour and again don't flatten. After go up to window and press the history tool. Then go to the paint brush on the left side, right click and select history brush. Then go to the history drug down and select the free transformation. Then you can draw over the picture where you may want colour.
 This outline was created by selecting a photo from the Internet. I used a small brush and on a new layer I zoomed in and draw around where I wanted to create an outline effect. I used the colour white for this. After I selected the layer where I drew around the image and I selected the move tool and moved the outline over to the right.
To create your own brush from a image of google or your photos you import the image. Then on your keyboard select Control C to copy and then control V to paste it into a new layer. I then went to edit and clicked the define brush pre-set tool. Then you can find your image in the brush selection and change the colours and size to want your wanting to use it for.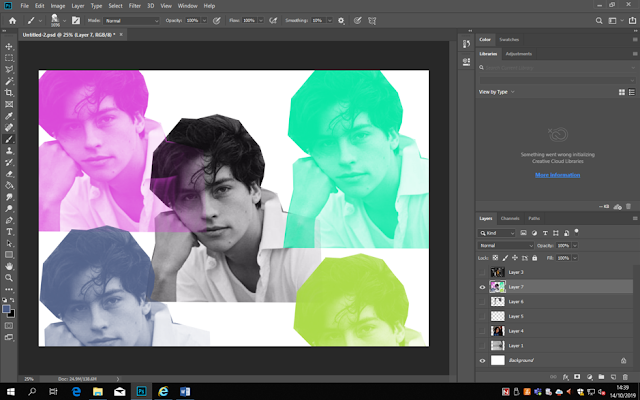

I then used a photo of myself, which I used the history brush tool and other drew around myself with the paint brush tool.

After I then started playing around with the tools that I have learnt. I downloaded some brushes to create a moon and star effect. Adding a dark background and used the less tool to cut out the singer. I created this 3D effect by duplication the layer with the picture I wanted to use. I then selected the fx button at the bottom of the layers pallet and chose blending options. After I then deselected the G and B colour which made the picture red. Aplying all layers I then chose the move tool and move the original picture over the the side to finish the 3D effect.

To finish off, we had to copy a photoshop image created by our teacher, to test our new skills. I downloaded Ivy brushes and created a diamond shape with 2 colours and layered them so the ivy was behind the first shape. We also added text as this was the start of our next tutorial about text in photoshop.


No comments:
Post a Comment